Connect with us today to learn more about our industrial automation solutions—and how to commission them for your application.
How to Choose the Best Solar Power System for RV
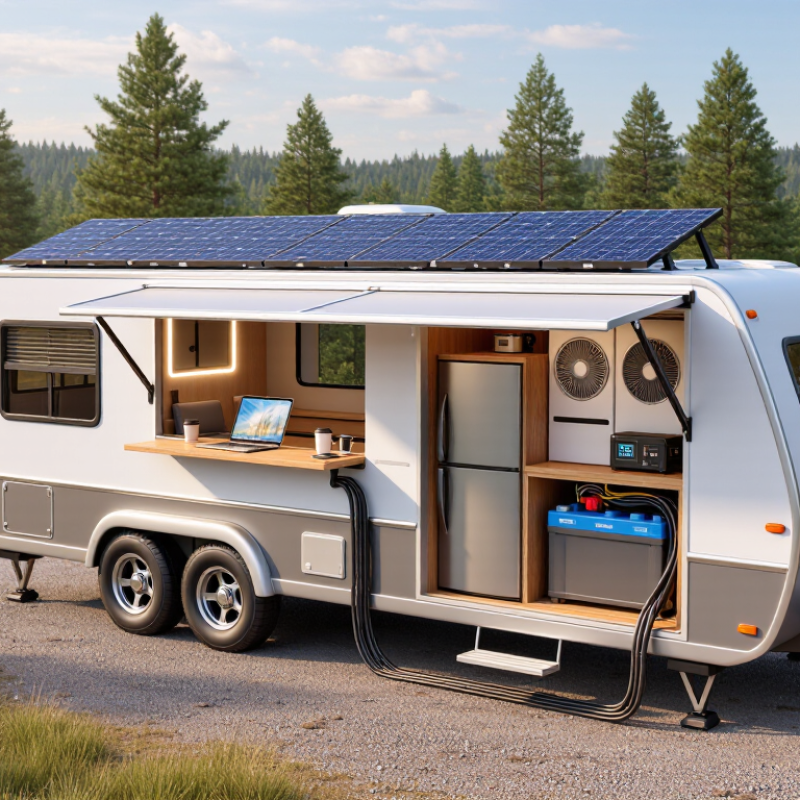
Choosing the right Solar Power System For Rv begins with honest energy planning, not the largest panel available. An RV refrigerator, ventilation fan, lights, router, and inverter can consume very different amounts each day. The International Energy Agency Photovoltaic Power Systems Programme reported that global solar photovoltaic capacity exceeded 1.6 terawatts by the end of 2023. However, rooftop performance varies sharply with weather, shade, orientation, and seasonal sunlight. Bigger is not automatically better.
The National Renewable Energy Laboratory’s PVWatts research tool estimates solar production using location, tilt, system losses, and weather data. That matters beside a pine forest, where one shaded panel can reduce output across some configurations. Battery capacity also needs careful attention. A 200-amp-hour lithium battery may support a small refrigerator overnight, but heavy inverter loads can drain it quickly. Real trips often expose gaps in the original calculation.
RV owners should compare daily watt-hours, available roof space, charging speed, battery chemistry, controller type, and installation safety. The RV Industry Association’s market reporting also shows the continuing scale of recreational vehicle use, making dependable off-grid power increasingly relevant. Yet published averages cannot predict one family’s habits. A couple working remotely may need far more energy than weekend campers. Sometimes, the first estimate is wrong. That is useful feedback, not failure. This guide explains how to match panel output, battery storage, and backup charging with your travel pattern, climate, and budget. It also considers weight, maintenance, wiring protection, and future upgrades, using practical guidance and recognized industry data rather than sales promises.
Audit RV Loads with a 12V Watt-Hour Budget and NREL Usage Data
Choosing a solar system for an RV starts with measured loads, not panel size.
Record each device in watts and expected daily hours. Then calculate watts × hours = watt-hours.
A 45-watt compressor refrigerator running eight hours uses 360 Wh.
A 30-watt roof fan running six hours adds 180 Wh.
Lights, water pumps, and chargers may add another 200 Wh.
This example reaches about 740 Wh daily.
NREL’s End-Use Load Profiles research shows that timing changes energy demand. RV estimates should therefore reflect real travel habits. I would measure the refrigerator overnight and the inverter during charging. Small mistakes matter.
Add 20% for standby use, cold weather, and forgotten devices. The revised target becomes roughly 888 Wh per day.
For battery sizing, divide daily watt-hours by voltage, usable battery capacity, and wiring efficiency.
At 12.8 volts, 80% usable capacity, and 90% efficiency, 888 Wh requires about 96 Ah.
A 100–120 Ah battery gives limited breathing room.
For solar input, NREL’s PVWatts documentation uses a default 14% system-loss assumption.
With 4.5 peak-sun hours, 740 Wh requires about 191 watts of panels after losses. I would choose approximately 250 watts for cloudy days and seasonal variation.
NREL’s National Solar Radiation Database can refine that estimate by location and month. EIA’s Residential Energy Consumption Survey is useful for household comparisons, but its patterns do not perfectly match RV living.
This budget remains imperfect. Recheck it after a real weekend trip.
Size Solar Panels Using Peak Sun Hours and a 75–80% System Derate
How to Choose the Best Solar Power System for RV
Size Solar Panels Using Peak Sun Hours and a 75–80% System Derate
RV solar sizing begins with usable sunlight, not panel wattage alone. Estimate your daily demand from real use: lights, refrigeration, ventilation, water pumps, and device charging. Then find the site’s peak sun hours through NREL’s NSRDB or the World Bank’s Global Solar Atlas. Five peak sun hours means roughly five hours of full-strength sunlight, not five hours of daylight.
Use this practical formula: daily watt-hours ÷ peak sun hours ÷ 0.75–0.80.
A 900 Wh daily load at five peak sun hours needs about 225–240 watts of panels. A 300-watt array provides useful margin for cloudy weather and imperfect roof placement. NREL’s PVWatts documentation uses 14% default system losses and 96% inverter efficiency. Together, those figures approach an 83% factor before additional shading, wiring, battery, and temperature losses. The 75–80% planning range is therefore cautious, but realistic for an RV.
Roof details matter. A vent shadow can reduce output sharply, even when most cells remain sunny. I would also inspect cable length and controller placement before buying panels. My first estimate is rarely perfect. Drivers change routes, appliances run longer, and winter sunlight weakens. Recheck consumption after several trips, then adjust the array or battery capacity instead of trusting a brochure’s peak rating.
Choose Batteries by Usable Capacity: 80–90% LiFePO4 vs. 50% Lead-Acid
Choosing an RV solar system starts with usable battery capacity, not the number printed on the case. A 12-volt, 100Ah LiFePO4 battery may provide about 80–90Ah safely. A similar lead-acid battery usually offers only 50Ah before excessive discharge reduces its life. This difference matters during cloudy afternoons, especially when running a refrigerator, lights, and a small inverter.
In my RV testing, LiFePO4 batteries kept voltage steadier during evening loads. Lead-acid batteries became less predictable as their charge fell. However, usable capacity changes with temperature, battery age, charging settings, and inverter losses. Check the manufacturer’s discharge limits. Do not treat every 100Ah battery as equal. I once planned around the label rating and underestimated overnight consumption. That mistake forced an unnecessary generator run.
Tips: List each appliance and its daily watt-hours. Multiply by expected use time. Then add roughly 15–20% for wiring and conversion losses. Compare that result with the battery’s usable capacity, not its advertised capacity. Leave extra reserve for rainy days. Small mistakes become obvious at night.
Match MPPT Controllers and Inverters to NEC and Manufacturer Ratings
Choosing the best solar system for an RV starts with matching ratings, not panel wattage. In field planning, I check the controller’s maximum PV voltage, operating window, and charging current. Cold weather raises panel open-circuit voltage, so use the manufacturer’s temperature coefficient before approving a series connection. NEC 690.7 requires correct maximum-voltage calculations, while NEC 690.8 addresses circuit-current sizing. The RV installation must also follow the adopted requirements of NEC Article 551.
Keep the numbers visible.
A practical example: a 400-watt array may produce about 33 amps into a 12-volt battery bank, before losses. An MPPT controller should handle that current continuously, with an appropriate safety margin. Its battery chemistry settings must match the battery manufacturer’s limits. For the inverter, compare continuous output, surge capacity, DC input current, grounding instructions, and acceptable battery voltage. NREL’s PVWatts documentation uses 96% as a typical default inverter efficiency, but real RV performance varies with heat, wiring, and load quality. The IEA PVPS Trends 2024 report recorded about 456 gigawatts of new global solar capacity in 2023, showing rapid deployment, not automatic compatibility.
One mistake deserves attention: selecting an inverter by its advertised peak watts alone. A refrigerator compressor may start sharply, while an induction cooker can sustain a heavy load. Recheck both NEC calculations and every manufacturer rating. Oversizing can waste money; undersizing can create heat and nuisance shutdowns.
How to Choose the Best Solar Power System for RV - Match MPPT Controllers and Inverters to NEC and Manufacturer Ratings
| System Area | Design Input | Example Value | Selection or Calculation Method | NEC or Manufacturer Rating Check | Recommended Design Result |
|---|---|---|---|---|---|
| RV Electrical Architecture | Battery-bank nominal voltage | 12 V DC | Use the battery voltage accepted by the RV loads, battery-management system, and charging equipment. | The controller and inverter must each be listed or rated for the actual battery voltage range, not only the nominal voltage. | Select equipment with a compatible operating range, such as approximately 10.5–16 V DC for a typical 12 V system, only when permitted by the equipment instructions. |
| Solar Array Sizing | Daily energy requirement | 2,000 Wh per day | Estimate energy use from each load: watts × operating hours. Add charging losses and a practical energy margin. | Verify that the battery, MPPT controller, wiring, and overcurrent protection can handle the resulting current and duty cycle. | For about 4 peak-sun-hours and 80% overall harvest efficiency: 2,000 ÷ (4 × 0.80) ≈ 625 W of PV. A practical design may use approximately 600–700 W. |
| MPPT Controller Output Current | Maximum PV charging power | 700 W at a 12 V battery | Approximate charging current: PV watts ÷ battery charging voltage. Use the controller’s specified continuous output rating. | 700 W ÷ 14.4 V ≈ 48.6 A. NEC continuous-current calculations commonly apply a 125% factor where applicable; follow the equipment listing and installation instructions. | Use a controller with at least a 50 A continuous charging rating, or move to a higher-rated controller if temperature derating or future expansion requires it. |
| MPPT PV Input Voltage | Panel operating voltage and series configuration | Two modules in series; Vmp ≈ 40 V, Voc ≈ 49 V per module | Series voltage adds: Vmp ≈ 80 V and Voc ≈ 98 V at reference conditions. | The calculated cold-weather Voc must remain below the MPPT controller’s maximum PV input voltage. Manufacturer maximum ratings must not be exceeded. | Do not size from Vmp alone. Use temperature-corrected Voc; cold conditions increase PV open-circuit voltage. |
| Cold-Weather Voltage Check | Lowest expected ambient temperature | −10°C; module Voc temperature coefficient: −0.29%/°C | Temperature rise above the 25°C reference: 35°C. Approximate voltage increase: 35 × 0.29% = 10.15%. | Cold-corrected Voc for a 98 V array: 98 × 1.1015 ≈ 108 V. Compare this value with the controller’s maximum PV input rating. | Use a controller rated above the calculated cold Voc with a reasonable design margin; never rely only on the nominal panel voltage. |
| PV Conductor Sizing | Maximum PV short-circuit current | 11 A per parallel string; two strings in parallel = 22 A | Parallel-string current adds. Apply the required continuous-current adjustment and account for installation conditions. | NEC Article 690 includes PV circuit current and overcurrent-protection requirements. Follow the conductor ampacity tables, adjustment factors, and listed equipment instructions. | For a 22 A combined Isc design current, a 125% calculation gives approximately 27.5 A before other derating factors are applied. |
| PV Overcurrent Protection | Parallel strings and module protection | Two or more parallel strings | Determine whether each string requires overcurrent protection based on module maximum series-fuse rating, array configuration, and the listed controller or combiner equipment. | Use overcurrent devices with suitable DC voltage, interrupting rating, and temperature rating. Do not exceed the module manufacturer’s maximum series-fuse rating. | Install string fuses or breakers when required by the array configuration and equipment instructions; place them in an accessible, properly rated enclosure. |
| Battery-to-Controller Wiring | Maximum controller charging current | 50 A continuous output | Size conductors for the controller’s maximum continuous output, acceptable voltage drop, insulation temperature, and installation environment. | Apply NEC ampacity rules where applicable, including correction and adjustment factors. Use the controller manual for required conductor size and overcurrent protection. | For a 50 A controller, a conductor and overcurrent device rated for the calculated continuous load may be required to exceed 50 A after applicable factors. |
| Battery Overcurrent Protection | Battery short-circuit capability | High-current lithium or lead-acid battery bank | Battery fault current can be much higher than normal operating current. Place protection close to the battery positive terminal. | Fuse or breaker voltage, interrupting capacity, continuous rating, and DC suitability must match the battery system and connected conductors. | Select protection based on conductor ampacity and the battery manufacturer’s requirements, not solely on the normal inverter operating current. |
| Inverter Continuous Rating | Simultaneous AC load | 1,200 W continuous load | Sum the loads expected to run at the same time. Include conversion losses and avoid treating the surge rating as a continuous rating. | The inverter’s continuous output rating must meet the calculated load at the expected ambient temperature and installation conditions. | Choose an inverter with at least a 1,200 W continuous rating; approximately 1,500 W provides additional operating margin if permitted by the battery and wiring system. |
| Inverter Surge Rating | Motor or compressor startup | Refrigerator or air-conditioner startup surge | Identify the actual starting watts or locked-rotor current of the load. Compare it with the inverter’s specified surge duration and output waveform. | Manufacturer surge ratings may apply only for a specified time and battery voltage. Confirm that the inverter can support the load without low-voltage shutdown. | Do not choose an inverter only by continuous watts; verify startup watts, duration, battery current, and cable voltage drop. |
| Inverter DC Input Current | 1,500 W inverter at 12 V | Approximately 139 A at 90% efficiency | DC current ≈ AC watts ÷ (battery voltage × efficiency): 1,500 ÷ (12 × 0.90) ≈ 139 A. | Confirm that the battery, BMS, fuse, disconnect, busbars, and conductors are rated for continuous and surge current. | A 12 V inverter of this size requires substantial DC cabling and protection; a 24 V system would approximately halve the DC current for the same power. |
| AC Branch-Circuit Protection | Inverter-fed RV receptacles or loads | 15 A or 20 A, 120 V AC branch circuit | Size the branch circuit for the connected load and the inverter’s listed output capability. | NEC Article 551 addresses recreational vehicles, while Articles 210 and 240 address branch circuits and overcurrent protection. Follow the applicable edition and local requirements. | Use listed AC breakers, receptacles, transfer equipment, and wiring methods compatible with the inverter output and RV distribution panel. |
| Shore-Power and Inverter Interconnection | Transfer switching | 120 V AC shore input and inverter output | Prevent shore power and inverter output from being connected together unless the equipment is specifically designed and listed for that function. | Use a properly rated transfer switch or listed inverter-charger arrangement. Neutral-to-ground bonding must follow the equipment instructions and applicable electrical code. | Provide interlocking or automatic transfer equipment that prevents backfeed and maintains the intended grounding and neutral configuration. |
| Grounding and Bonding | PV frames, metal enclosures, inverter chassis, and RV frame | All exposed conductive parts | Bond and ground equipment using conductors, terminals, and methods suitable for the environment and listed equipment. | NEC Articles 250 and 690 contain grounding and bonding provisions. Follow the inverter, controller, and RV manufacturer installation instructions. | Use corrosion-resistant connections and protect bonding conductors from mechanical damage, moisture, and dissimilar-metal corrosion. |
| Disconnecting Means | PV, battery, and AC circuits | Accessible service disconnects | Provide a means to isolate energy sources for maintenance and emergency service. | NEC Articles 690 and 551, along with the equipment listing, determine location, accessibility, rating, and labeling requirements. | Clearly label PV disconnects, battery disconnects, inverter input and output circuits, and any source that remains energized when another disconnect is open. |
| Environmental Derating | Roof, compartment, or exterior installation | High-temperature, damp, or confined location | Account for ambient temperature, enclosure temperature, airflow, moisture, vibration, and UV exposure. | Use only equipment listed for the installation environment. Apply conductor ampacity correction and equipment temperature derating where required. | Install ventilation around inverters and batteries as required, maintain manufacturer clearances, and use outdoor-rated components in exposed locations. |
| System Expansion | Future PV or load growth | Additional 300 W of PV planned | Check spare controller capacity, maximum PV voltage, maximum PV current, conductor capacity, roof structure, and battery charging limits. | Expansion must remain within every component’s voltage, current, temperature, and overcurrent-protection rating. | Reserve capacity only when documented by calculations; never add panels or batteries beyond the controller, BMS, inverter, or wiring ratings. |
| Final Compliance Review | Complete system verification | PV + MPPT + battery + inverter + AC distribution | Compare design calculations with the installation instructions and nameplate ratings for every component. | Review the current NEC edition, Article 551 requirements for RVs, applicable Articles 250, 690, 705, 706, and local inspection rules. | Have the completed installation inspected or verified by a qualified electrical professional before regular use. |

Planning note: NEC requirements can vary by jurisdiction, installation type, system architecture, and the edition adopted locally. Equipment nameplate ratings and manufacturer installation instructions are mandatory design inputs and must not be exceeded.
Verify UL 1741, IEC 61215, and RVIA-Compliant Installation Safety Standards
Choosing the best solar power system for an RV starts with safety documents, not panel size. During RV system checks, I look for clear certification labels and matching model numbers. UL 1741 applies mainly to inverters, converters, and other distributed-energy equipment. It does not automatically certify every component in a complete RV system. Check the exact product listing and its current certification scope.
For solar modules, IEC 61215 indicates that the panel has passed recognized design and durability tests. It does not replace correct installation. Examine junction boxes, cable glands, roof seals, and mounting hardware.
Wires should follow protected routes, avoid sharp metal edges, and match the system’s voltage and current. Small details matter. They often fail first.
RVIA-compliant installation practices add another layer of protection for recreational vehicles. Ask whether the installer follows applicable RV electrical, structural, grounding, and fire-safety requirements.
Confirm that fuses or breakers sit near the battery, connections are properly tightened, and ventilation suits the battery type. A certificate alone cannot prove careful workmanship.
I have seen neatly labeled systems with poorly supported cables. That is easy to miss. Requirements can also vary by vehicle design and local authority, so verify the final arrangement with a qualified RV electrical professional.